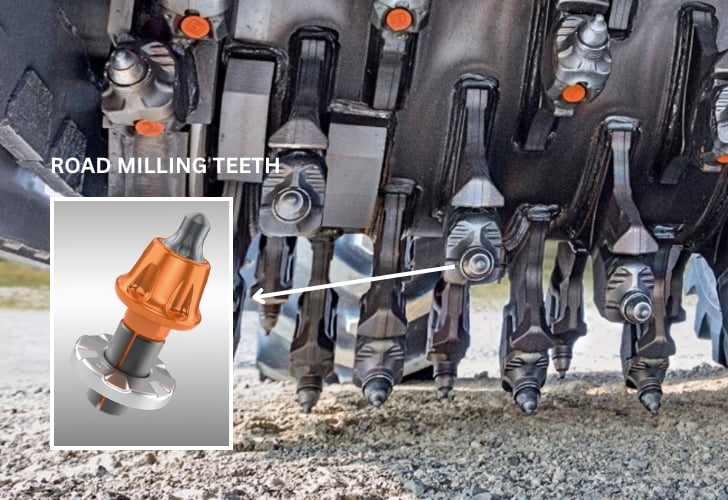
Road milling teeth, or cold planer bits, may look small, but they determine the cost, speed, and quality of every milling job . As the replaceable cutters mounted on a milling drum, their condition directly affects cutting efficiency, fuel consumption, surface finish, and machine downtime. Extending their service life is a straightforward way to cut operating costs and keep projects on schedule. Let's start with the reasons why road milling bits are damaged.

(Image Source: wirtgen-group.com)
Why Your Road Milling Bits Wear Out Faster Than Expected
Wear from direct contact with pavement is inevitable, yet it only tells part of the story. Rapid failure usually comes from various factors, such as wrong tooth type for the job, improper installation or drum set-up, aggressive cutting parameters, road contaminants, and mistakes in inspection and maintenance. Understanding these causes makes it possible to move from reactive replacement to planned, cost-effective care.
1. Low-Quality Bits

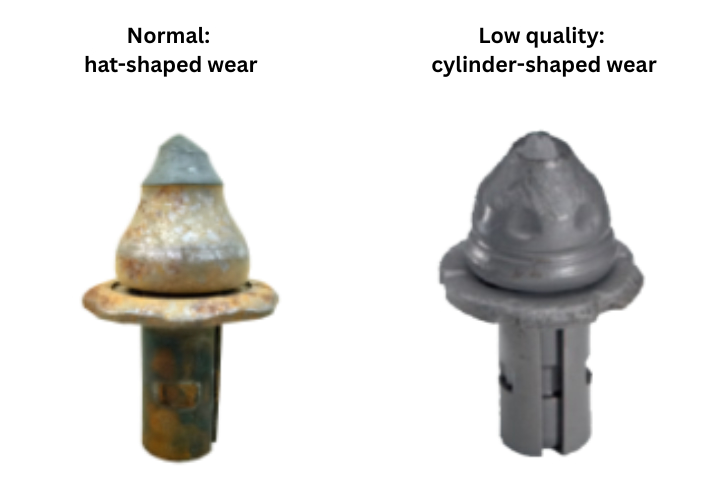
(Image Source: everpads.com)
If cylinder-shaped wear happens (instead of hat-shaped wear), it often points to one underlying issue: poor bit quality. Low-grade road milling bits tend to lose their tip material too early or fail to rotate properly. As a result, uneven or accelerated wear occurs long before cold planer bits reach their expected lifespan. To avoid these problems, it's best to invest in high-quality bits from reputable manufacturers. Reliable products offer better material strength, consistent rotation, and longer service life.
2. Excessive Use
Every cold planer bit has its service limit. When bits are used beyond that limit and not replaced in time, the wear doesn't just stay on the bit. It spreads to the bit holder as well. Once the tooth holder itself becomes worn out and continues to be used, the bits will start to wear abnormally fast or even break.
3. Wrong Tooth Type

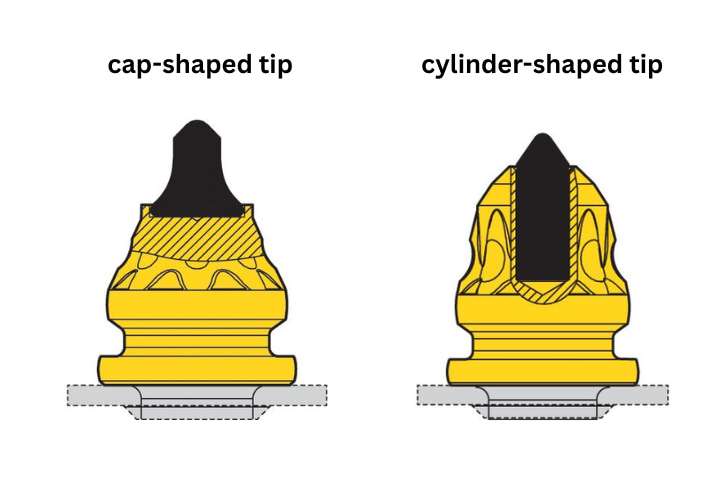
(Image Source: cat.com)
Another common mistake is using the wrong bit type for the job. For example, using asphalt bits on concrete pavement, or concrete bits on asphalt, can cause rapid wear and even fracture. Choosing the right bit for the right material is the first and most basic step toward extending tool life. (Cap-shaped tip is for asphalt and cylinder-shaped tip is for concrete)
4. Harsh Site Conditions
Under certain working conditions, road milling teeth are more likely to suffer abnormal damage such as accelerated wear or even tip fracture. These conditions can arise from factors including uneven pavement, unknown objects in the surface layer, or inconsistent hardness in the material being milled. Thorough ground investigation and assessments in advance are crucial.
5. Hazards in Urban Road Maintenance
In older city roads, many manhole covers were not raised to match the new pavement level and remained just a few centimeters below the surface. During repair milling, where the asphalt layer is only about 4–5 cm thick, the milling drum can unexpectedly hit and lift a manhole cover. The impact can easily break several bits at once, dislodge holders, or even tear the conveyor belt. These hidden obstacles are a frequent cause of sudden tool failure during urban milling work.
6. Material Build-Up
If the waste material in the milling chamber isn't cleared in time, it will accumulate and continuously rub against both bits and holders. At the same time, excessive debris buildup reduces the cooling efficiency of the water spray system, allowing the temperature to rise sharply and accelerating wear. Upgrading to a drum with higher discharging efficiency is highly recommended.
7. High Speed Operation
Sometimes, the steel body of a road milling bit wears out even before the carbide tip does, a clear sign that the problem doesn't lie with the bit itself. This usually happens when the coad milling machine is operated at an excessively high speed, causing delayed material discharge. Then, as we mentioned earlier, the material build-up can eventually damage teeth and holders.
8. No Cleaning After Operation
Failure to clean the milling drum after operation allows debris to harden in the gaps between bits and holders. When the machine restarts, these hardened materials can prevent proper bit rotation, resulting in uneven wear or premature failure.
5 Practical Ways to Make Your Road Milling Bits Last Longer
Now that we understand the main causes of road milling bit wear, we can focus on how to reduce it and make the picks last longer. So, what practical steps can we take to prevent these problems and extend the service life of the bits?
1. Conduct Regular Inspections and Replace Worn Teeth in Time
Routine inspection is one of the simplest yet most effective ways to extend the lifespan of cold planer bits. During daily operation, operators should carefully check the condition of the milling drum and key components such as the bits and holders. Once noticeable wear or damage is detected, the affected parts must be replaced immediately to prevent chain wear and costly downtime.
Check the teeth every 6 to 8 hours of operation. Make sure each bit can rotate freely within the holder. Free rotation helps distribute wear evenly and prevents localized damage. When replacement is required, maintain consistent projection lengths for all bits to ensure uniform cutting depth. If half of the bits in a set are already worn, it's best to replace the entire set and regroup the less-worn pieces for future use.
2. Ensure Proper Water Spray for Cooling
During milling, the drum and bits generate a lot of heat from continuous friction. Without enough water, the bits can overheat and wear out faster. Make sure the water spray system is working properly and that the milling area gets sufficient water to keep things cool and lubricated. When milling deeper layers, increase the spray volume to prevent the carbide tips from heat damage. For shallow milling (less than 6 cm), reduce the spray slightly. This helps the milled material discharge smoothly and minimizes unnecessary friction on the bits.
3. Control the Speed
Keeping the cold planer at a proper travel speed is key to protecting the milling bits. If the machine moves too fast, each bit cuts more material than it should. As a result, the impact and friction are increased, leading to faster wear or even breakage. The faster the advance speed, the heavier the load on each tooth and the poorer the milling quality.
When the milling drum speed is high, the planer's forward speed should be slowed down to ensure each bit gets an even cutting load. In projects with tight deadlines that require both high drum speed and fast movement, it's common to see abnormal wear and shorter bit life.
4. Clean the Milling Drum and Bits After Each Operation
After every milling job, make it a rule to clean the milling drum and bits right away. Any leftover asphalt, concrete, or debris can harden around the holders as it cools, preventing the bits from rotating properly the next time you use the machine. This leads to uneven wear and can quickly shorten tool life.
Use proper cleaning tools and mild cleaning agents to remove buildup without damaging the components. Also, check the holders for dust, wear, or sediment, and make sure the water spray system is clean and working efficiently.
5. Store Road Milling Picks Properly When Not in Use
When the milling bits are not in operation, proper storage makes a big difference in how long they last. Always keep them in a clean, dry environment and secure the picks to prevent scratching or knocking.
Conclusion
Regular inspection, proper operation, and timely maintenance are the keys to extending the lifespan of road milling bits. By ensuring sufficient water cooling, keeping the machine clean, operating at an appropriate speed, and storing the bits correctly, you can effectively reduce unnecessary wear and improve overall milling efficiency. After all, good habits in daily use and maintenance really matter a lot, saving both time and cost in the long run.
*All of the above images are not intended for commercial use.
